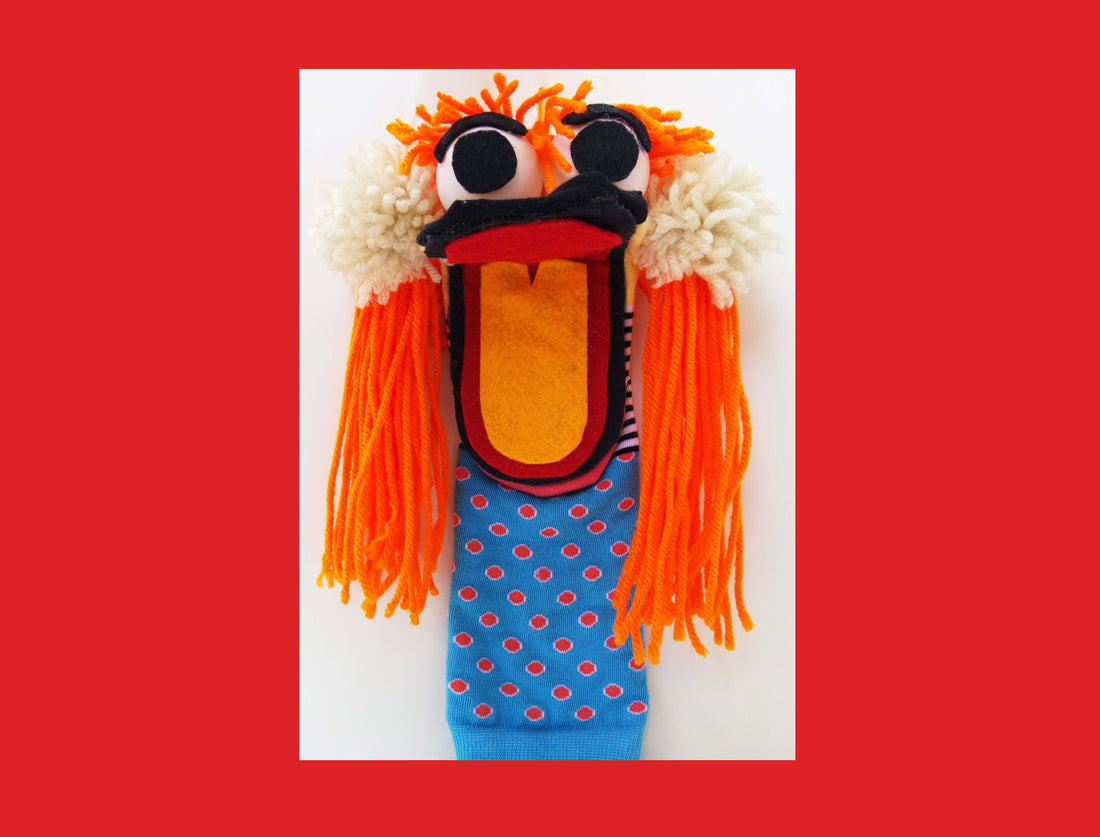
Welcome to our DIY Sock Puppet crafting guide! In this blog post, we will show you how to transform simple socks into adorable and entertaining sock puppets. This craft is perfect for kids, adults, and anyone looking to add a touch of creativity to their day. So gather your materials and let's get started on this exciting and budget-friendly project!
Step 1 (preparation):
Choose Your Socks: Begin by selecting the socks you want to use for your puppet. You can mix and match different patterns and colors to create unique characters. Make sure the socks are clean and dry before starting the craft.
Insert the cardstock in the sock. Make sure that the cardstock is inserted all the way (to the toe) of the sock and centered before you begin. This will be removed at the end, but is used to keep your glue straight and protect the other side of the sock from glue overspill.

Step 2 (cutting):
Create the Puppet's Face: Now, let's bring our sock puppet to life by adding a face. Take one of your socks and turn it inside out. Using the felt sheets or fabric scraps, cut out shapes for eyes, a nose, and a mouth. Alternatively, you can use googly eyes or buttons for the eyes. Get creative and design the face to match the character you have in mind. Use the template provided to cut out the felt for the puppets mouth, tongue, eyes, and eyebrows.
Step 3 (mouth):
Glue the felt in layers (see example vector drawing) to make the mouth of the puppet. DO NOT glue the felt onto the ping-pong balls yet.
Step 4 (eyes):
On the opposite side of the sock, towards the toe, glue the ping-pong balls on to make the eyes.
Step 5 (face):
Glue the Face Onto the Sock: Carefully glue the felt or googly eyes, nose, and mouth onto the toe area of the sock, which will serve as the puppet's face. Be cautious when using the hot glue gun and consider adult supervision if children are involved in the crafting process.
AFTER the glue has dried, attach the pupils and eyebrows (much easier to center the eyes this way vs having the felt glued on prior to attaching the ping-pong balls).
Step 6 (hair - sides):
Using the yarn provided for the hair (side) cut the yarn to 16” lengths. Lay the sock flat, eyes side up, and center the bundle of yarn across the sock behind the eyes. The yarn “hair” should drape evenly over each side of the puppet. After you’re satisfied with it’s placement, glue the yarn on the sock in the center area behind the eyes.
Step 7 (hair - top):
Using the yarn provided for the hair (top), cut the yarn to 5.5” lengths. After all the pieces have been cut, lay them out parallel and tie one piece perpendicularly around the center (to hold all the pieces together). Glue the bundle of hair, centered, on top of the hair you glued for the sides (see example picture). The hair should be positioned tightly against the back of the eyes.
Step 7 (pom poms):
The pom poms are not going to be glued (see example pictures). To make the pom poms, start by wrapping the provided yarn around your hand, leaving several inches to tie it. Take those several inches of yarn and wrap it around the center of your bundle to secure it (like the hair on top). Take scissors and cut the loops of the yarn bundle. Trim excess yarn to help with it’s shape, and with the remaining excess, tie the pom poms to each side of the hair of the puppet. Again, refer to the example pictures provided.
Step 8 (decorate the puppet - optional):
To add some flair to your sock puppet, you can use yarn, additional fabric, or even draw on details with fabric markers or acrylic paint. This is where your imagination can run wild, so feel free to customize your puppet according to your preferences.
Congratulations on completing your DIY sock puppet project! We hope you had as much fun creating these charming characters as you'll have while playing with them. Sock puppets are not only a delightful craft but also a fantastic way to engage in imaginative play and storytelling. So go ahead and share your puppet-making journey with others, and remember, the possibilities for creativity are limitless! Happy crafting!

Create Puppets for Different Characters: Don't stop at just one puppet! Repeat the above steps to create more characters with different personalities. Use various socks and different facial features to give each puppet a unique look.
Puppet Showtime! Now that your sock puppets are complete, it's time to put on a puppet show! Gather your friends, family, or even pets, and let the storytelling begin. Whether you create a scripted performance or improvise, the joy and laughter that ensue will make this craft even more rewarding.
Remember, these are instructions to make the puppet as we see fit, but you can always customize your design to make it unique and fun! Please share pictures of your work if you give us a product review! or tag us on instagram@sockmatestore
By Selin

